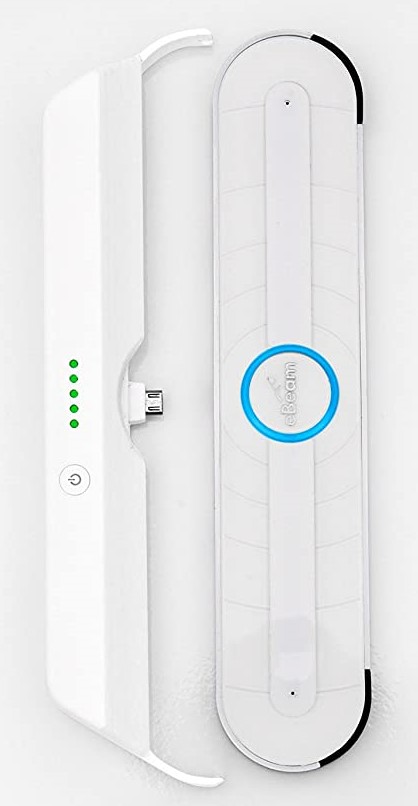
Luidia
Luidia was a small company that produced the eBeam receiver, which enabled TVs and projectors to be used as smart surfaces with the use of eBeam styluses. I had the privilege to wear many hats. I was officially a mechanical design engineer; however, I already had a good foundation in mechatronics, rapid-prototyping, and user experience design.
User Experience Testing and Blue Sky Development
When I first joined, my team was focused on blue-sky innovation, and my job was to invent new products that would serve our users (mostly teachers in the classroom, as well as some businesses that had a need for smart surfaces, generally as part of interactive meeting rooms to facilitate collaborationg and remote communication. This included ideation, prototyping, and user testing. That worked well for me, because I had the opportunity to work in a cross-disciplinary setting.
eBeam Glove
Anybody who has watched Minority Report has wanted a glove to control their computer. I was lucky enough to have an opportunity to build one. This was one of my first prototypes while working at Luidia. I used our existing stylus functionality, for locating the hand, and then added hover and gesture-based scrolling with a python script. Gestures were detected with flex sensors in the fingers and aluminum tape on the palm of the glove.
Clearly, this is a working prototype focus on functionality, rather than looks. I built and coded this prototype in about 3 days, and there is literally a battery taped to the side. However, it was exciting new form factor, and the company had a client that was particularly interested in hover functionality. That's how this wonderfully embarrassing video of my younger self demoing the eBeam glove came to be. As a side-note, the main concerns that arose over a glove form-factor were related to hygiene...which is obvious in retrospect.
We tried many other form factors and features, testing styluses with different buttons, different ergonomics, etc. The glove just happens to be my favorite!
flingnote
This was a project I'm very excited to have participated in, though my
front-end design skills were not a great fit for the technical development, so I
have to give most of the development credit to
Ruddick Lawrence.
My main contribution was to the feature set and overall collaborative brainstorming
experience, and I'm really proud of our end product.
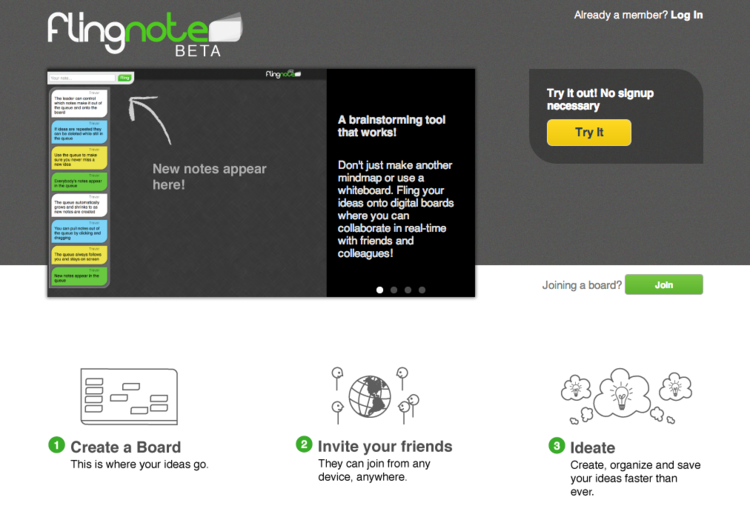
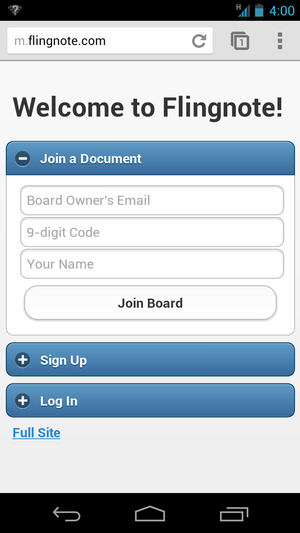
There are a number of mind-mapping apps out there, but they all assume their users already have content that needs to be organized. In contrast, flingnote was intended to help in the initial brainstorming and ideation phase. We wanted an environment that let everyone speak up, but also kept the group on track. Some of the main drawbacks to traditional brainstorms are:
- Everyone can't speak at once (without the group devolving into chaos)
- Holding onto an idea during a discussion is more distracting than most people realizes, and lowers engagement with the group.
- The softer-spoken group members get lost in the excitement of the louder ones.
Through our hallway testing and user testing, we found that the main bottleneck to any brainstorm was the host's inability to filter all the great ideas coming in. This is the main drawbacks in practical settings. If multiple people are given markers, then multiple conversations usually start, interrupting the cohesion of the group.
We solved this by distinguishing between the responsibilities of the host and all the other ideators.
- Host: A single host creates a meeting. Their main responsibility is to organize ideas and lead the discussion. They have full power to edit the board, moving notes, writing/drawing, and adding connections. The host can also add notes, to get the group started, but in most of our testing, they became busy with organization very quickly.
-
Ideators: The remaining users/ideators log in from their own mobile device or computer. They can all add
notes to brainstorm, but notes are queued on the left-hand side. All users can and like
any note in queue, sorting it to the top. This gets new ideas out quietly,
without hindering the flow of a good discussion. In practice, we found a significant
decrease in interruptions, even with larger (10+) groups. We also saw higher engagement
in conversation, presumably because people weren't distracted by thinking about what
they were going to say. A really exciting side-effect we hadn't anticipated was an
increase in ideas from traditionally less vocal participants. People felt more comfortable
sending messages to a queue, since they didn't need to speak up and interrupt.
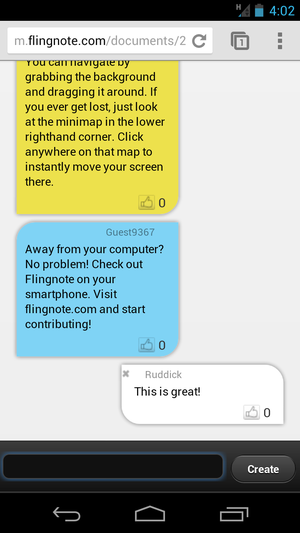
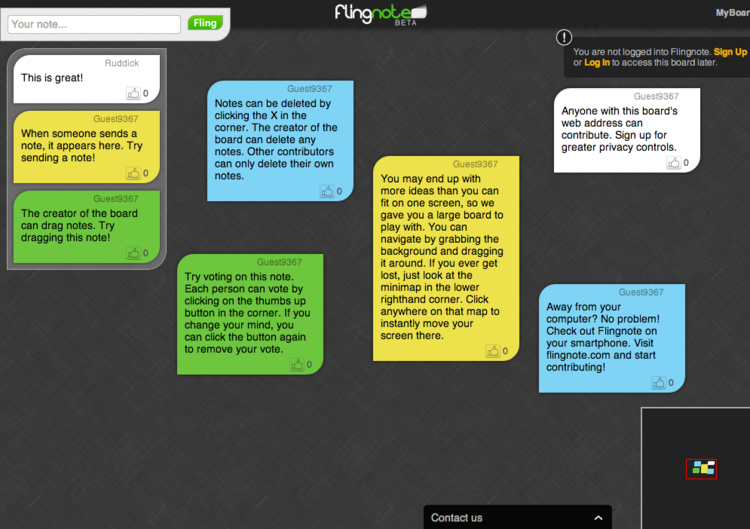
At the end of the meeting, the board is preserved and available to everyone online, so no one has to take a photo or notes to send to the group. The content can all be viewed and even edited later, as needed (with appropriate permissions).
MyBeam
One of the main challenges our users faced was setup time. Turning on a projector, connecting a computer, and starting an app sounds easy, but a few minutes of setup can be a significant deterrent, especially when adopting new tools. The idea behind this product was to eliminate that setup time, by creating a lower-power computer that would always be on, recording whiteboarding sessions without any setup. Note that we used an existing product, eBeam Capture, which allowed a whiteboard markers actively record their writing, just like a stylus.
We 3D printed a case to house a Beagle Board, and mounted it along with our eBeam edge receiver, and wrote a startup script, so that a session was always running. No monitor or project was needed. The system just worked as long as it was plugged in. This meant that any time someone started writing on the whiteboard in a meeting, they didn't need to set up equipment. In fact, they wouldn't even need to decide if whether to save the content until the end of the meeting. The session data was saved as an SVG image to a shared drive (using the DropBox API), and generate a thumbnail so that the files could easily be found later.
There were buttons to reset the board, though we also explored time-outs between meetings. We also experimented with pre-configured email addresses, so that a user could tap their name and be sent a copy. This had mixed results, since it required additional configuration. At the end, we did not pursue this project. We had two main issues. First, was adoption of a product that was intentionally quiet/invisible. Second, we had reliability issues with the eBeam Capture marker sleeves. This sometimes led to frustrating losses of information, and we decided that needed to be addressed before this tool would become viable.
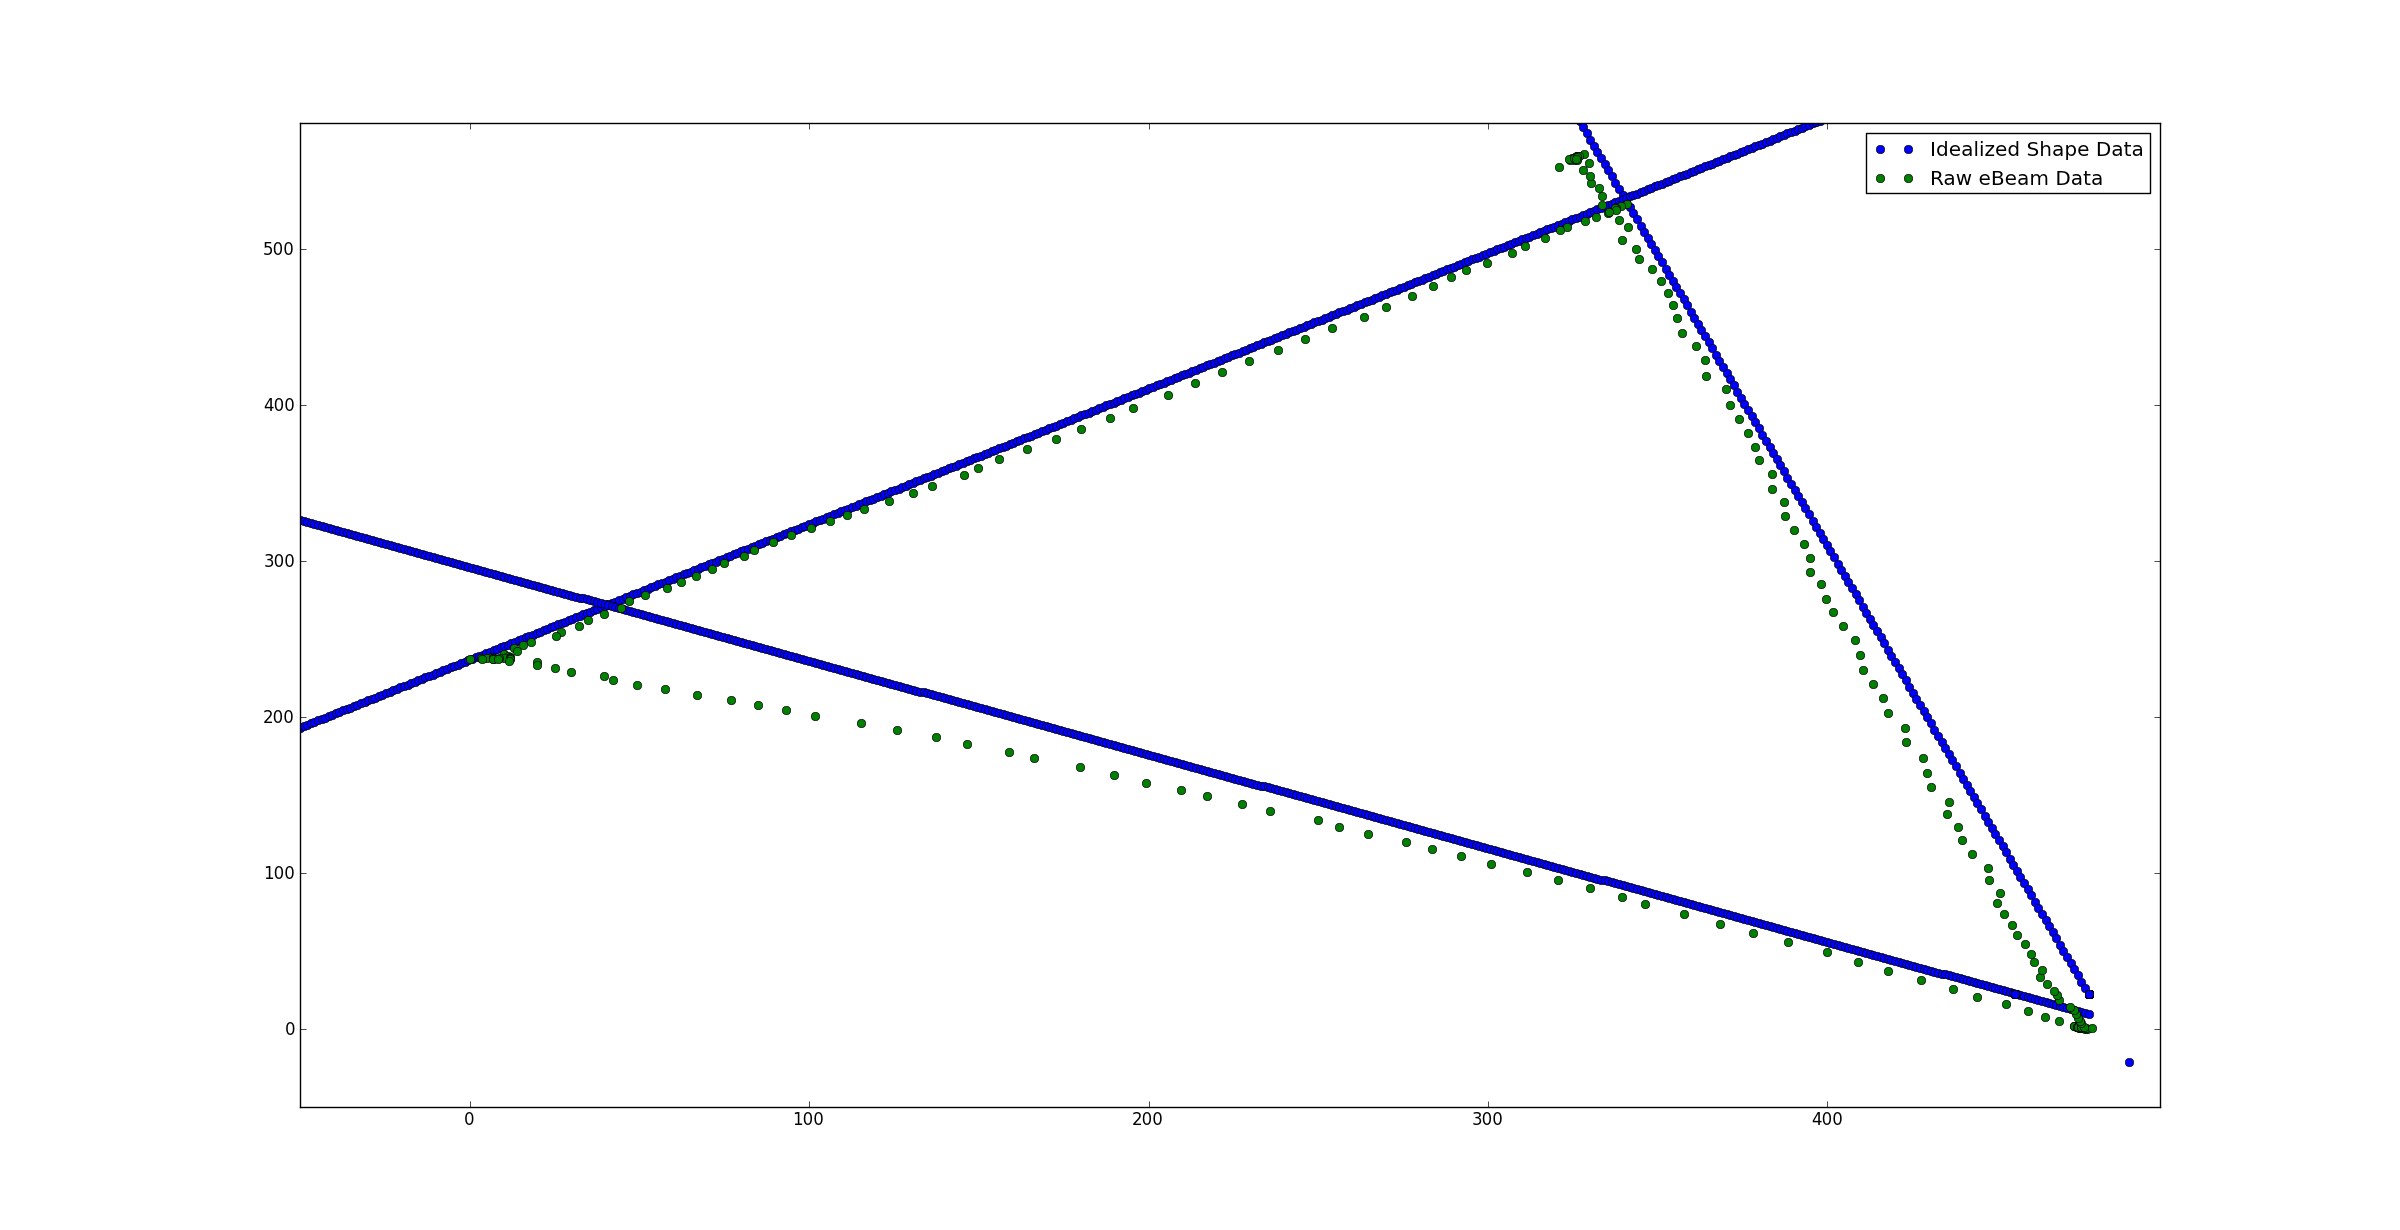
Shape Detection
Using a mixture of Hough Transforms and hand tuned corner detectors, I made a tool
that would detect pre-determined shapes from any line drawn on an eBeam canvas.
These lines were just a sequence of eBeam points. Anytime a drawing came
sufficiently close to an ideal shape, I would correct the point to their idealized
forms. Using this technique, it was easy to draw perfect lines, angles, circles,
rectangles, and stars.
Designing For Manufacturability
From a business perspective, we didn't have a good pipeline to then turn those prototypes into viable products. Eventually, our team was restructured, and the resulting group was in charge of refining quality (cost reudction, reliability/durability improvements, and release of new products.
Battery pack
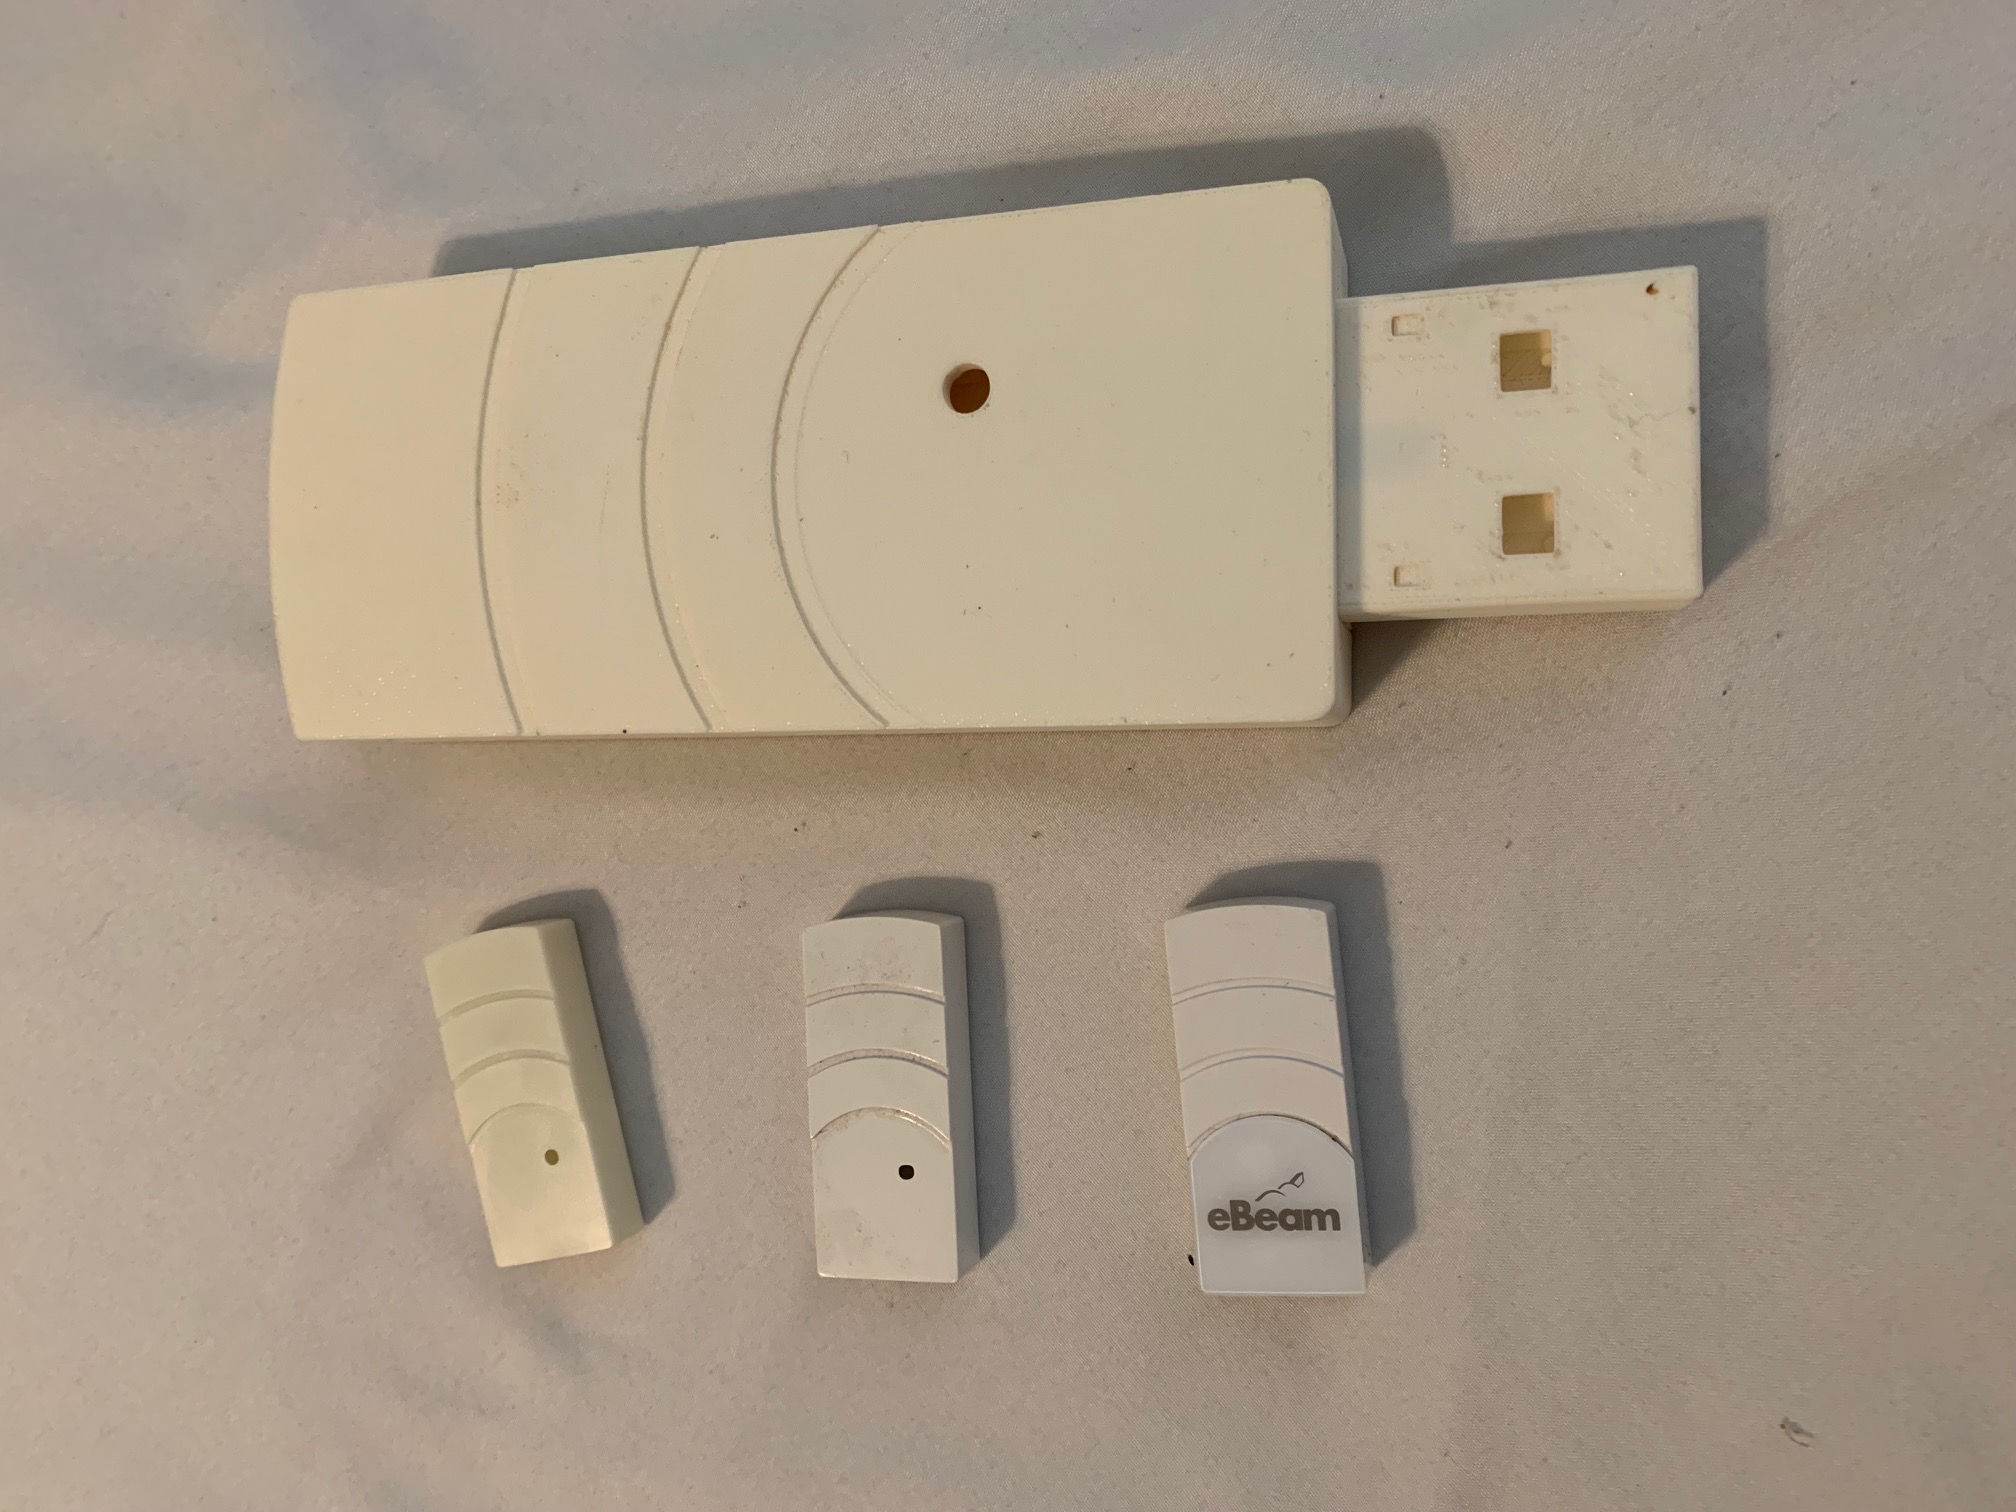
The battery pack was a roughly 3-4 month project, from concept to first molded parts. I was in charge of designing the enclosure considering mold considerations such as sink and draft angles, access to ultrasound and infrared receivers, as well as usability and durability and strain relief, buttons, light piping, etc. In addition to housing design, I sent quotes, selected and managed vendors for molding and battery selection.
This project was a huge learning experience for me. However, all the flaws seem painfully obvious to me now, and I very much wish I could go back in time and redesign the mechanism for mounting to the eBeam edge. Luckily, it did achieve a successful launch, and is still being sold 10 years later, so it clearly met our needs at the time.
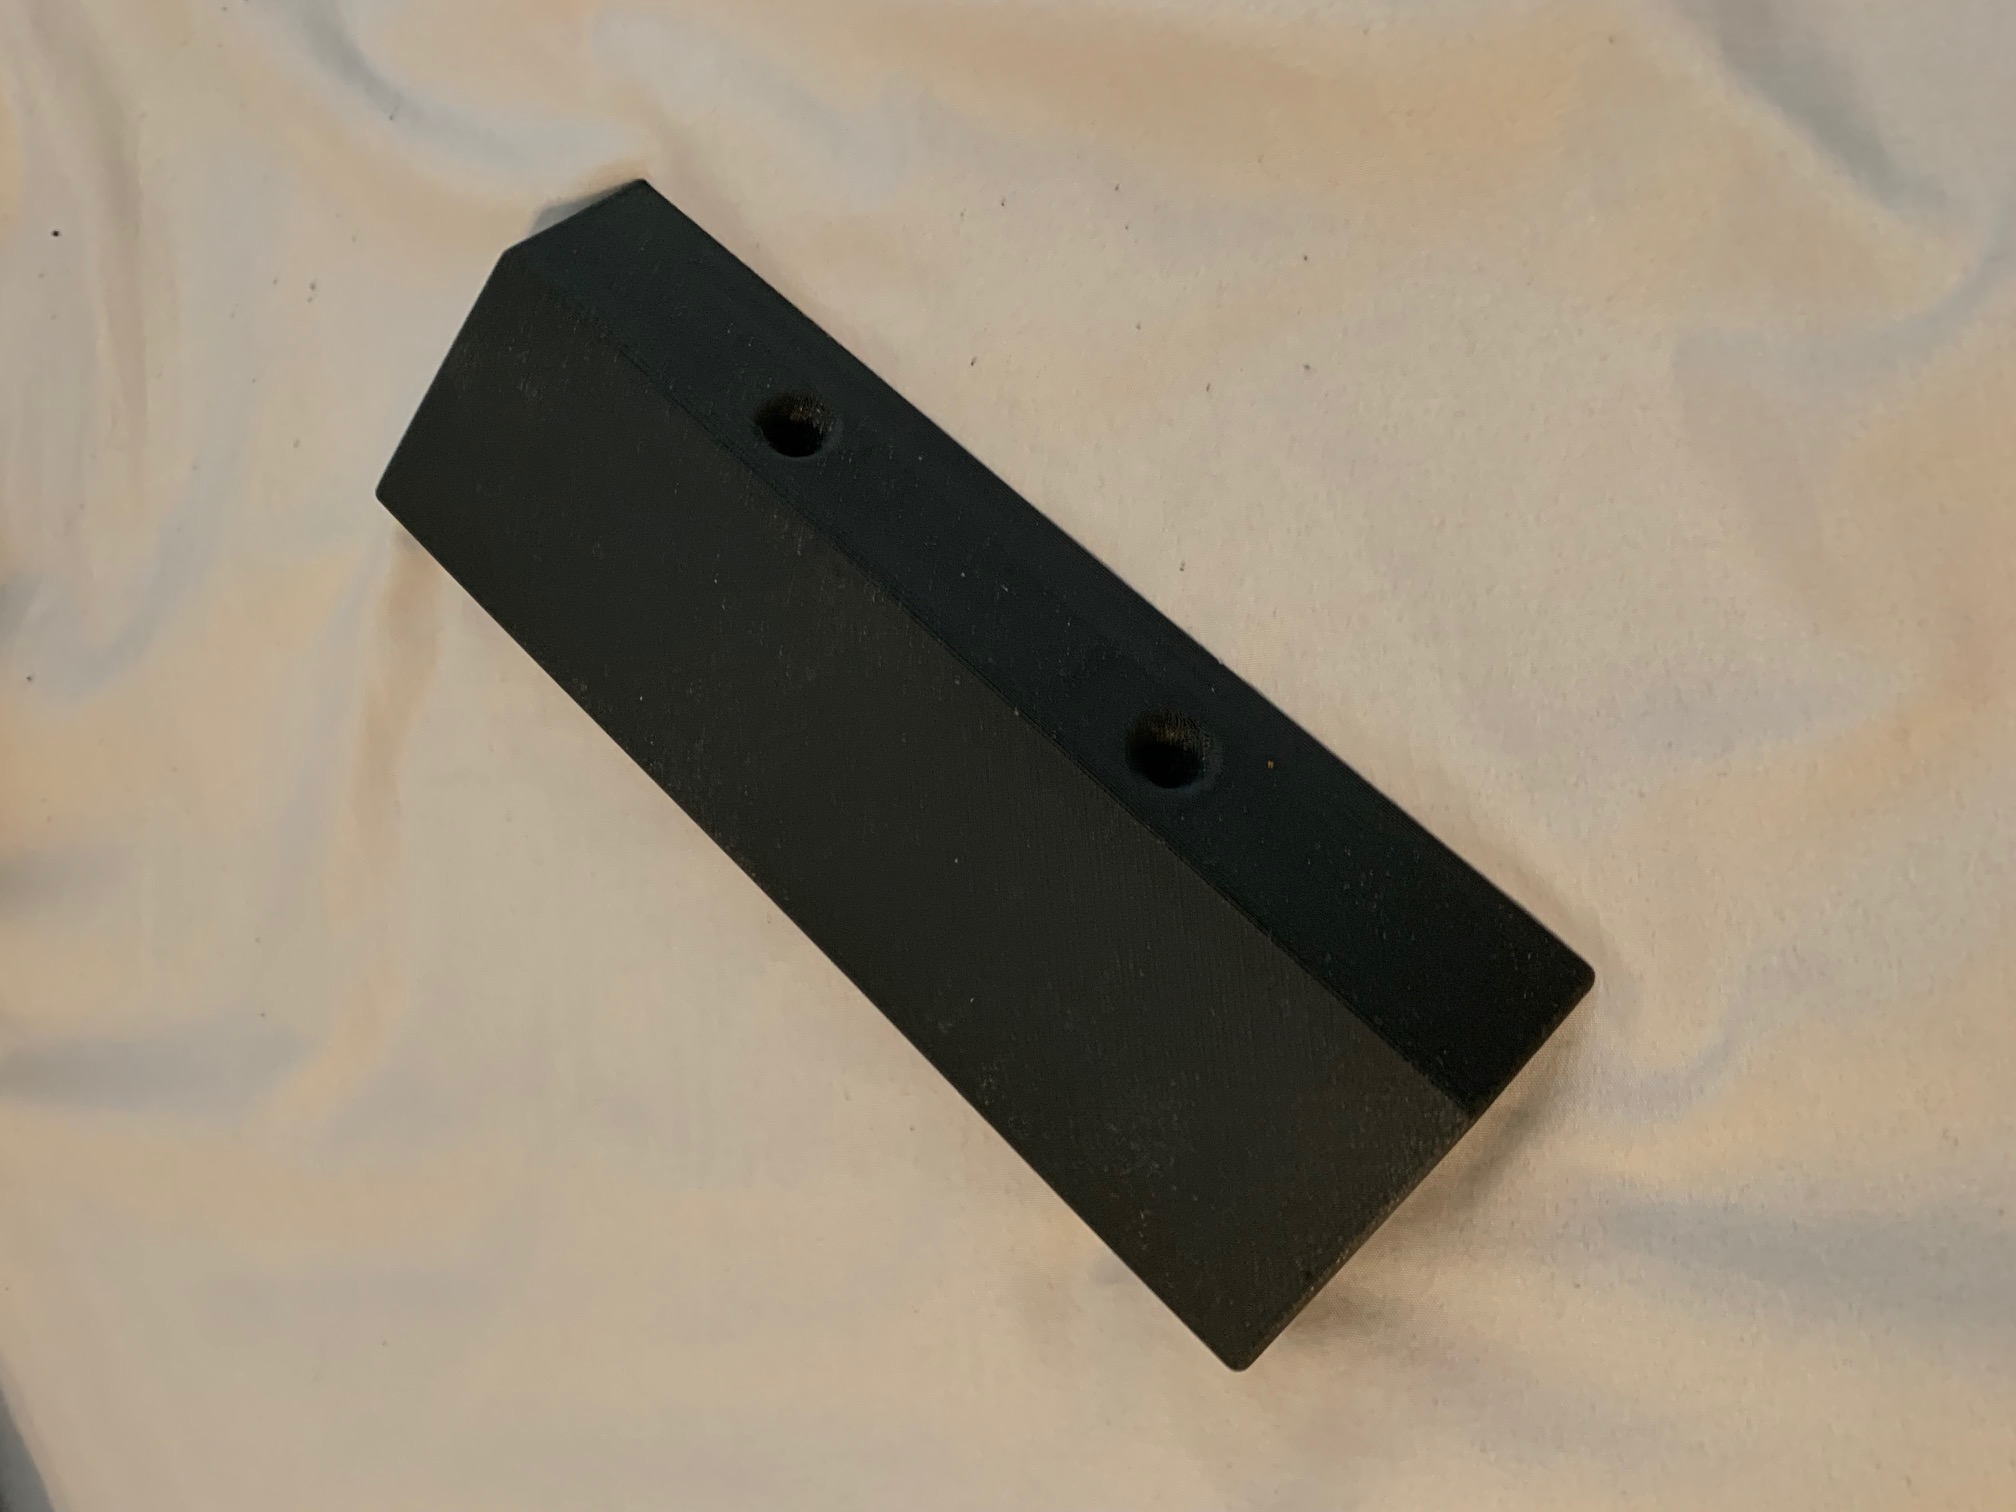
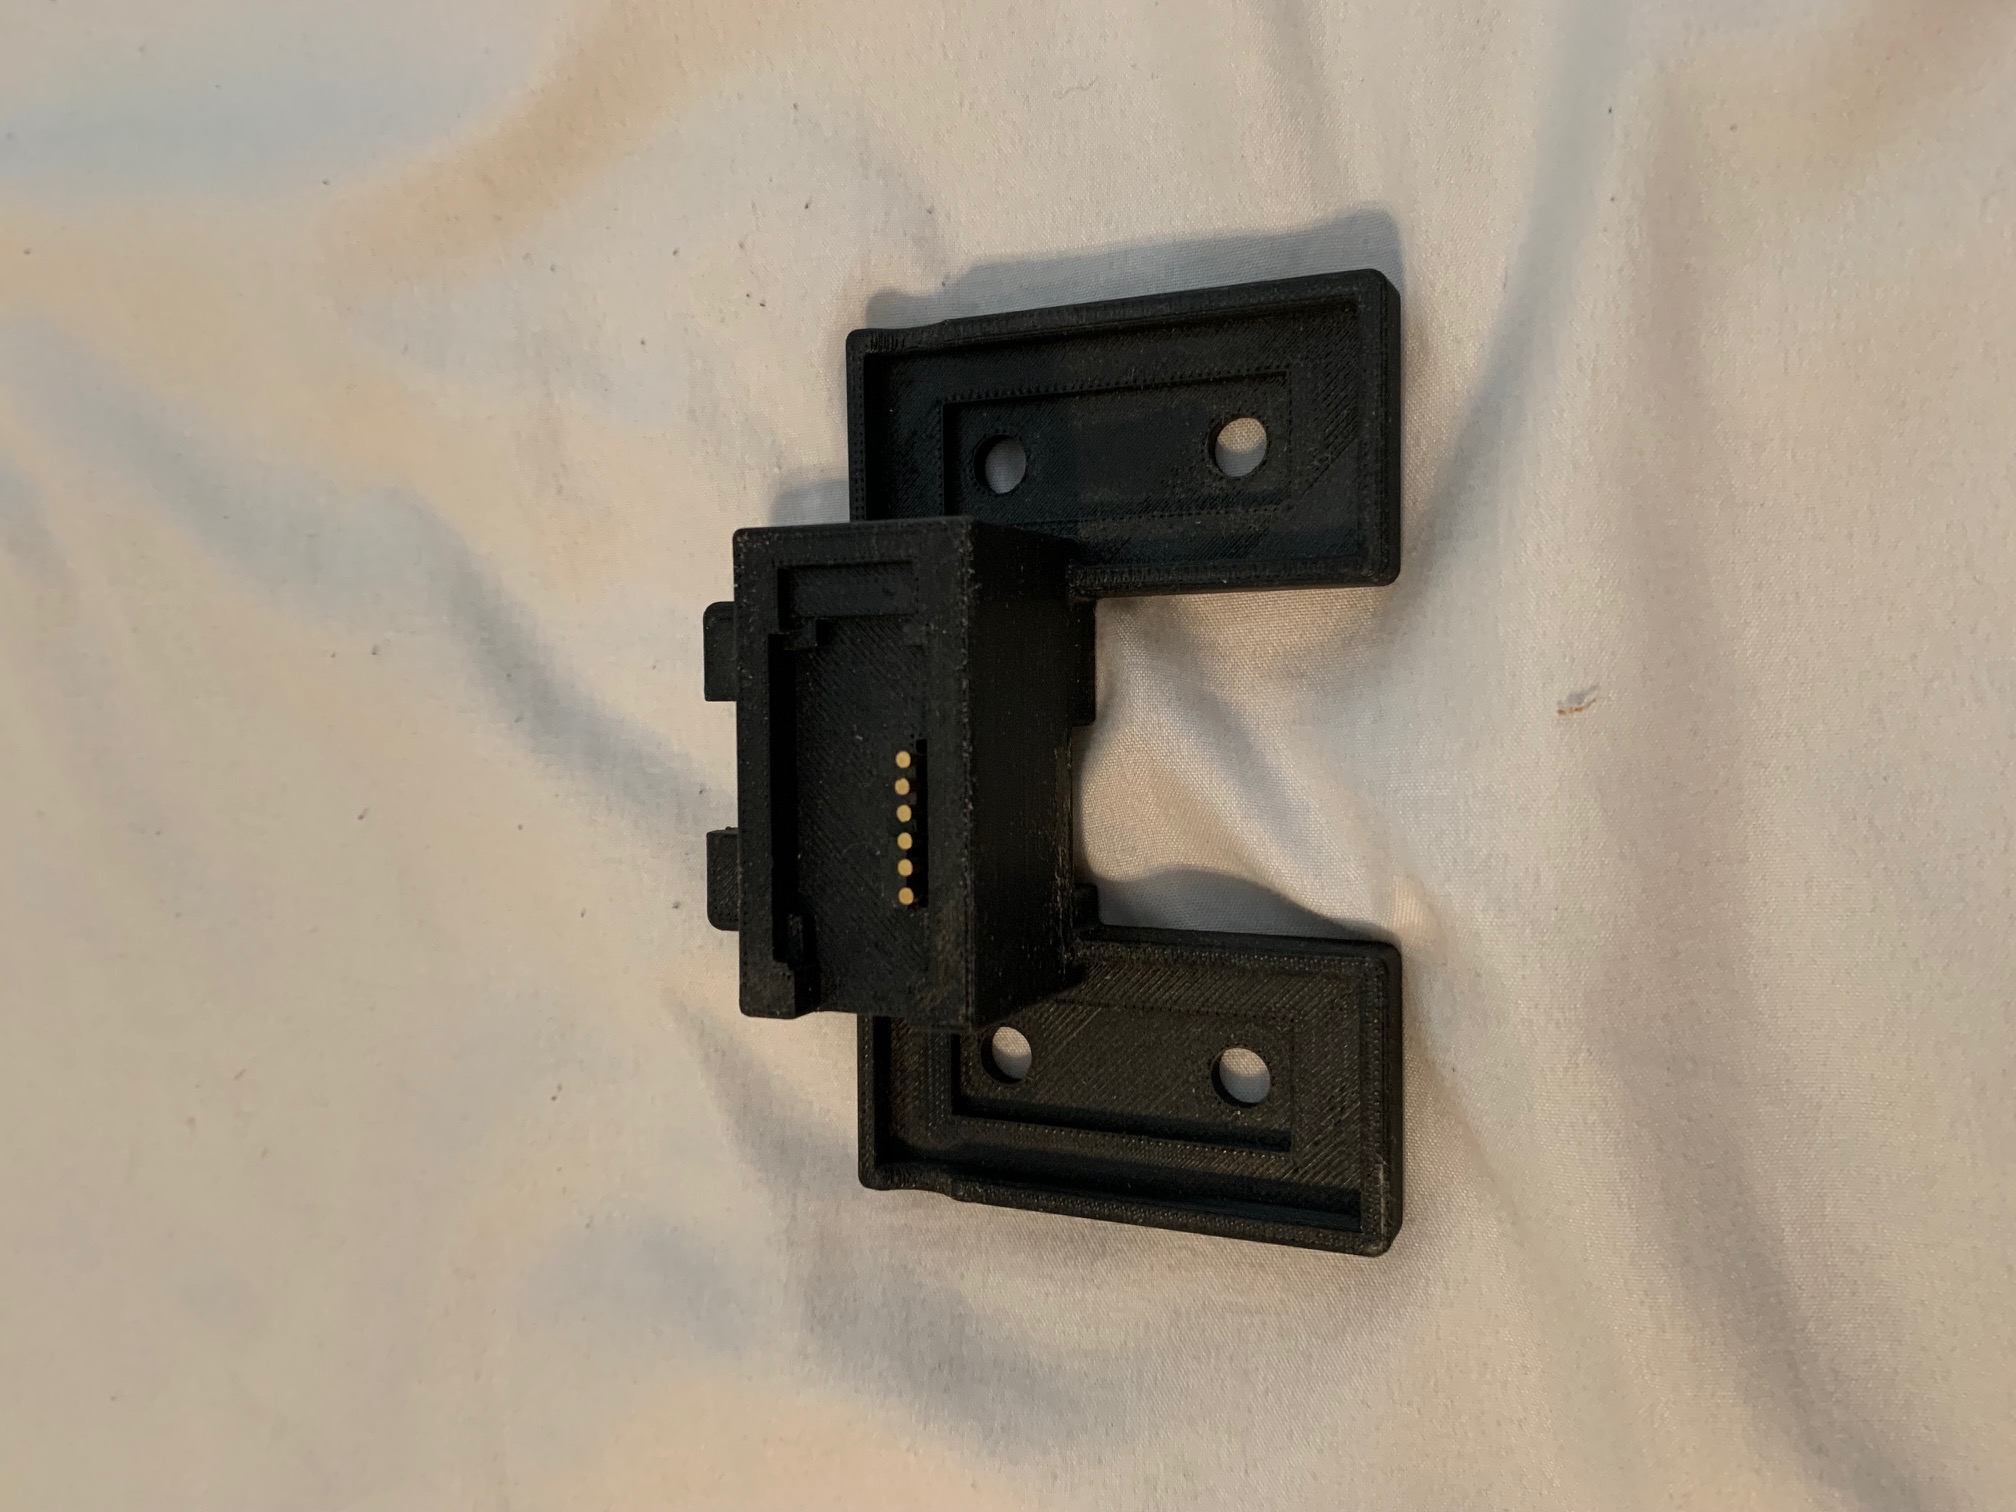
eBeam LCD Bracket

This bracket was a quick fix for customer who were switching from projectors to LCD screens. It went from concept to production in just about 2 months.
Eraser and Marker Sleeve drop-test improvements
The marker sleeves and erasers had been designed for office settings, but by the time I joined, Luidia had pivoted to ed tech, which meant kid-proofing the equipment, mostly to increase durability and drop-test performance. We tightened press fits, thickened hinges, potted the PCA, etc. in order to generally fortify the design and withstand higher impacts.
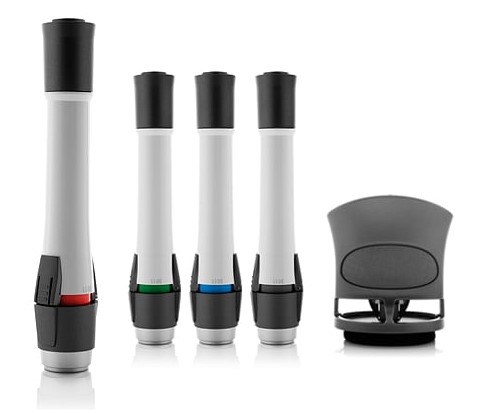
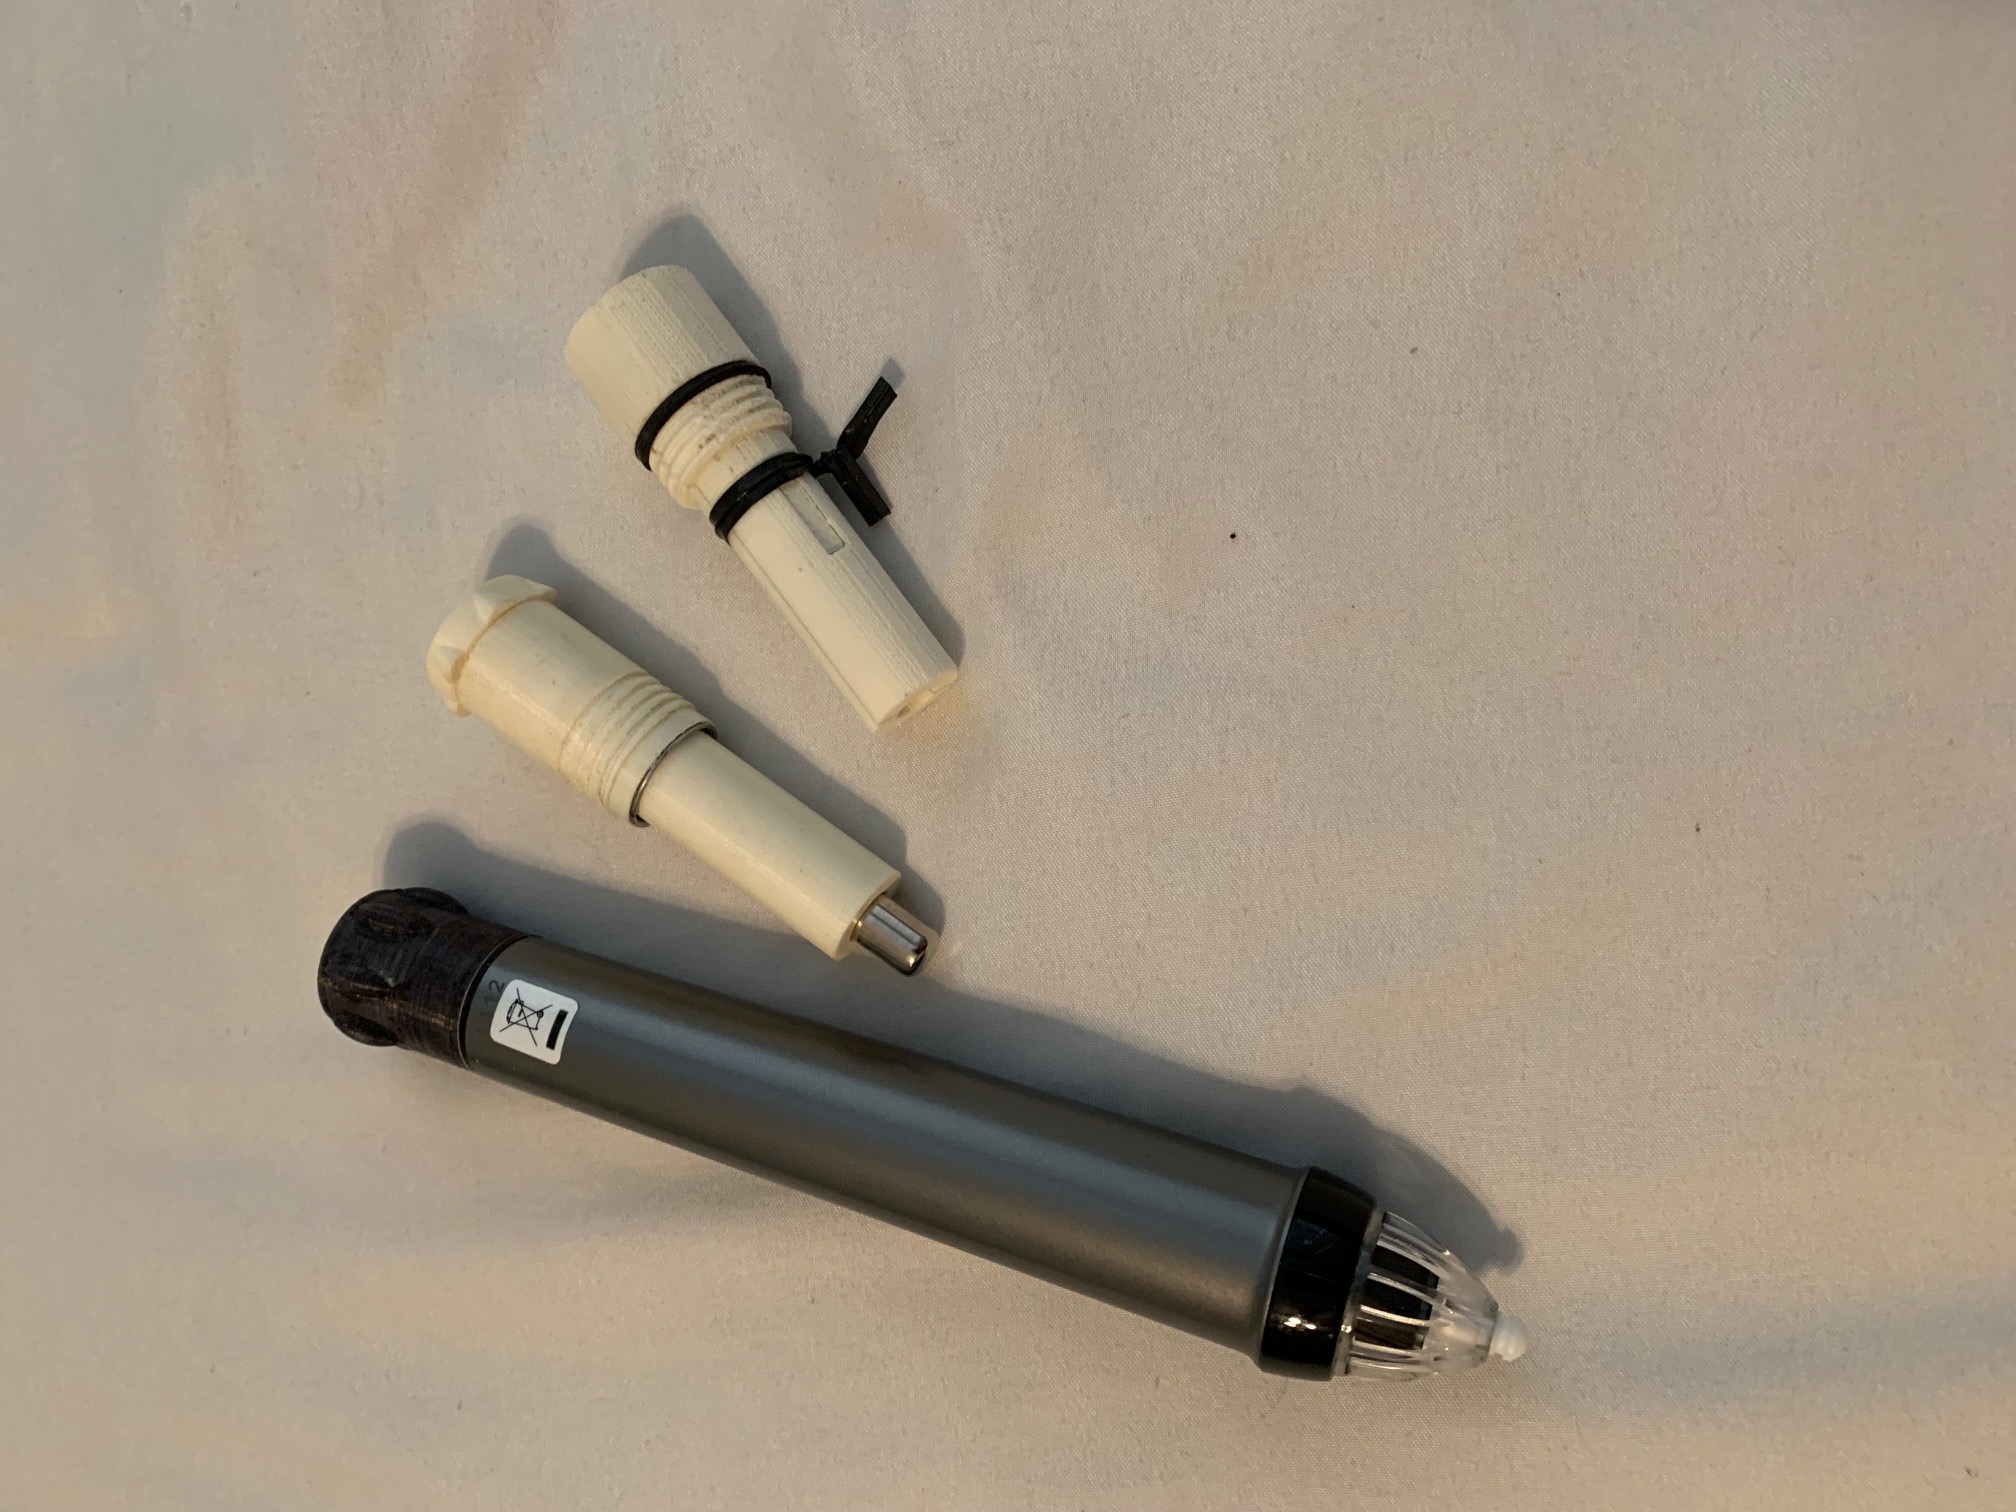
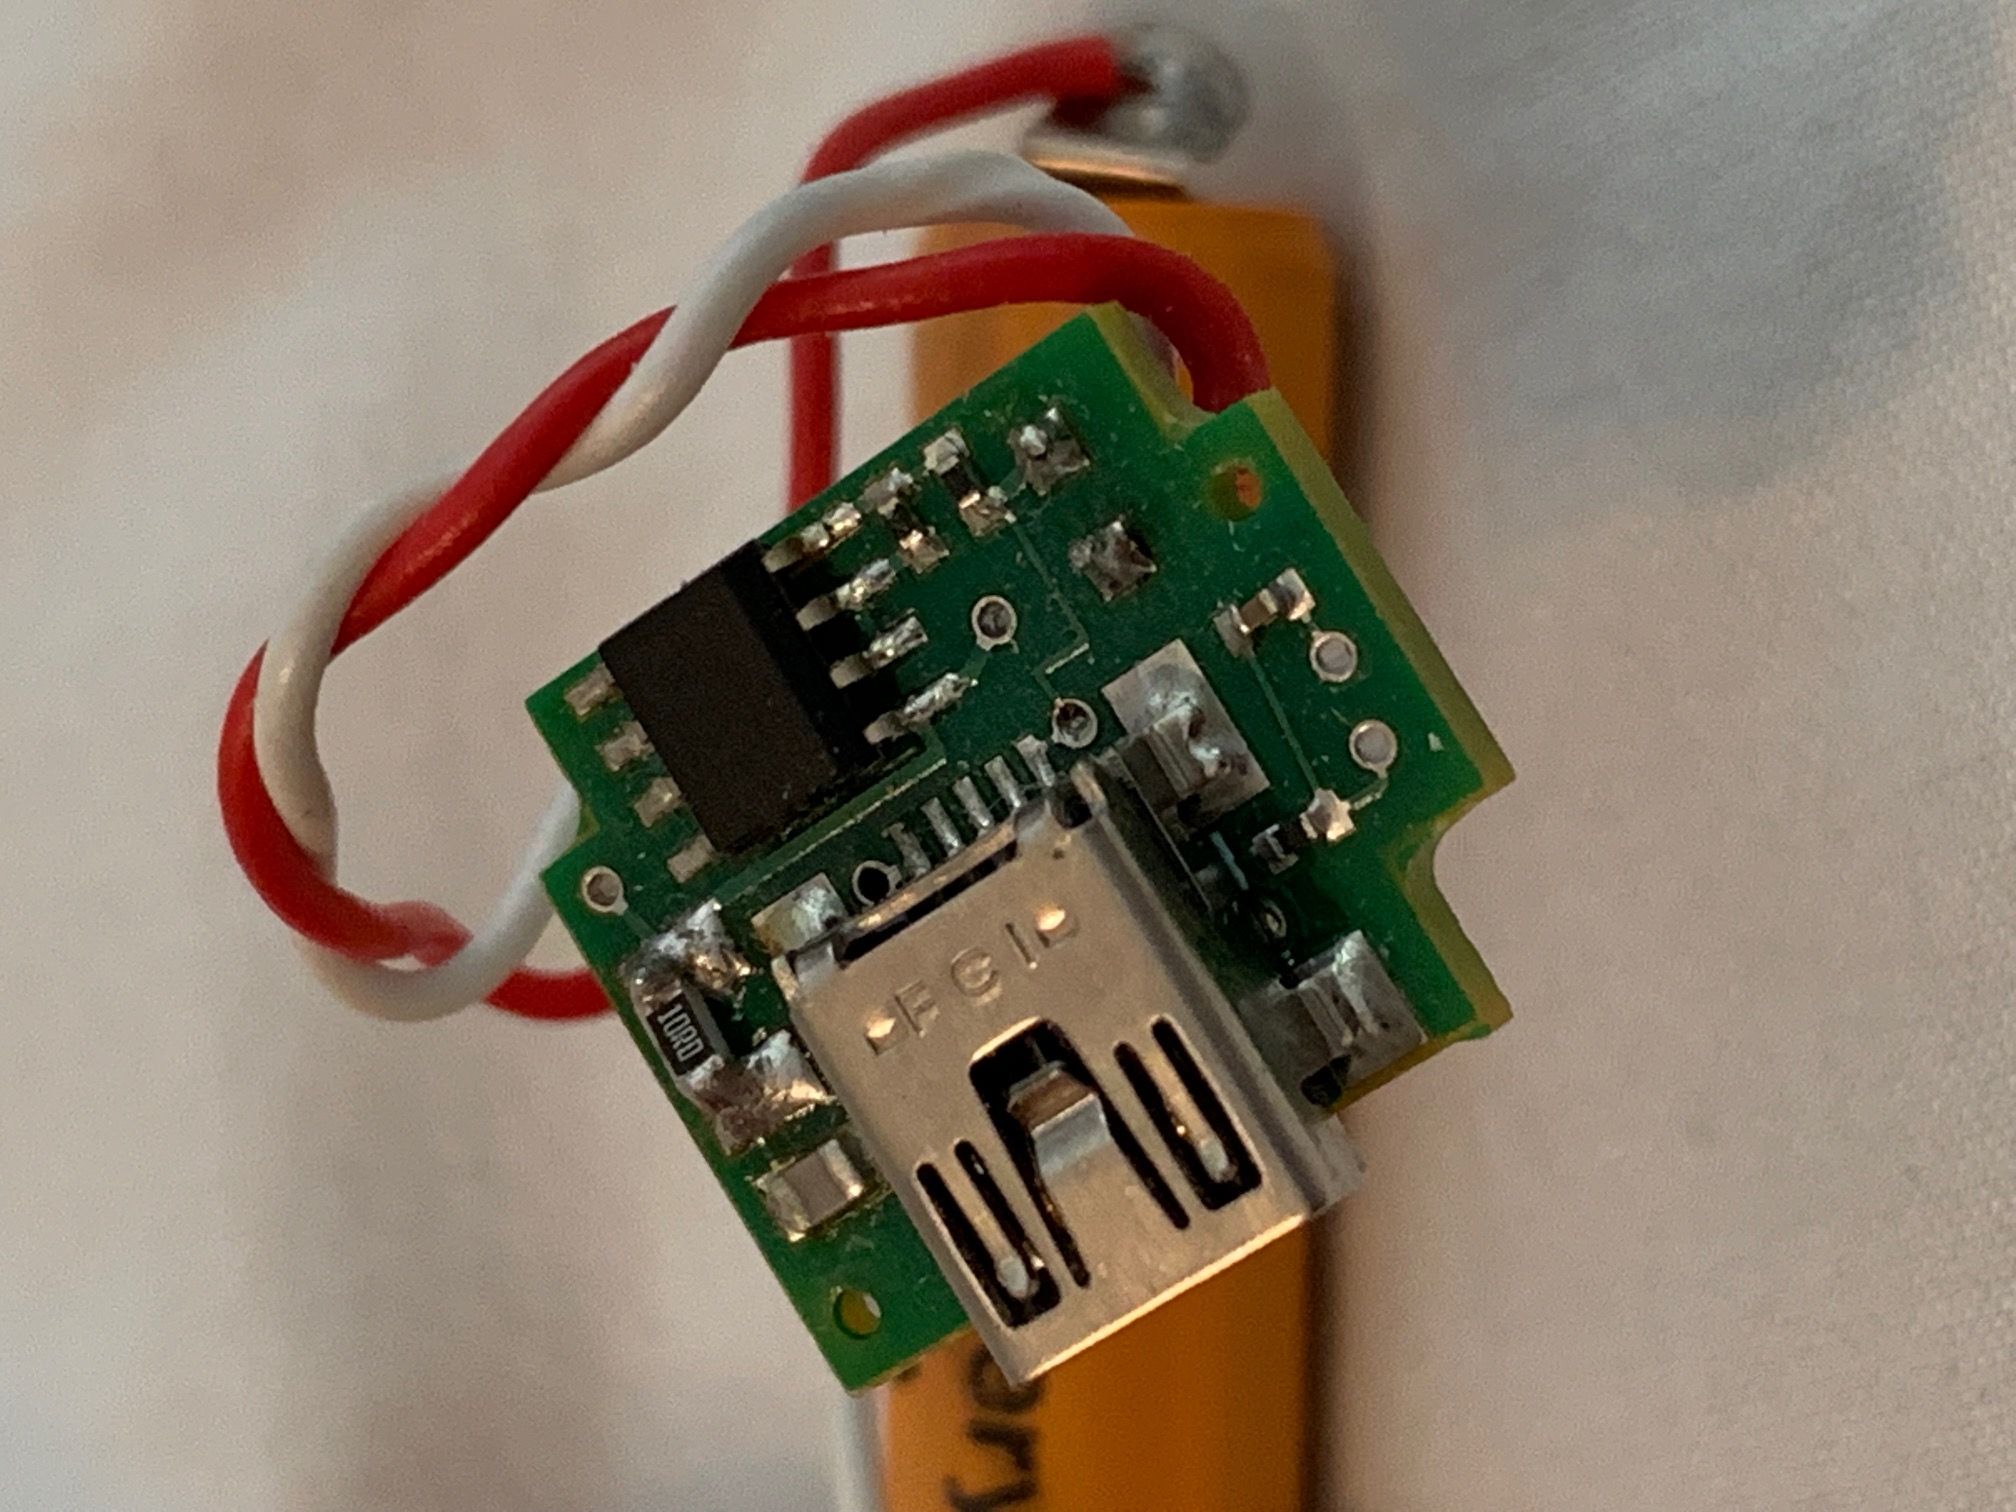
Rechargeable Stylus battery
The rechargeable stylus was build to upgrade an earlier generation of stylus, which had a relatively short battery life (measured in weeks, but still frustrating for a teacher that needs to have replacement AAs on hand).
- Circuit design: Designed and prototyped charging circuit, which charged and stepped up voltage of the Ni-MH cell to match a standard AA.
- Mechanical Design: Designed CAD model, and assembled functional 3D printed prototypes. Working with an existing product added a significant constraint to the form-factor, as the new rechargable unit had to fit on the existing stylus, which was intended for a single AA battery, creating space constraints.
- Sourced BOM, worked with vendors to etch and assemble boards, and quote molds.
 invisible
Jigs / 1-off Enclosures / Test Equipment
We often prototyped 1-off items for the sales teams or production teams to achieve a specific task. These included test fixtures, programming jigs, enclosures to demo how our product could fit with specific OEMs, etc.
Algorithmic Improvements
Some of our most needed product improvements were software focused. Our main whiteboard/canvas application and other front-end development was handled by our dedicated software team. However, I often had the knowledge and opportunity to address more algorithmic improvements, particularly when they closely related to sensors / hardware. That meant sensor calibrations, responsiveness, etc. often fell into my lap.
Off-plane Projection and temperature calibration
The core technology behind the eBeam stylus and receiver is an ultrasonic emitter on the stylus, and 2 microphones on the receiver. Every 15ms, an ultrasound pulse and an infrared pulse are both emitted. The time between receiving those signals can be used to calculate the time of flight for the ultrasonic sound pulse. Using the speed of sound, we can calculate the distance between the stylus and the microphones. Since we have 2 microphones, we can locate the stylus in 2D.
All of our code was written with the simplifying assumptions that the sensors were coplanar with the surface being written on. We started integrating our technology into projectors, which meant the sensors were mounted away from the board. This adds a full geometric projection to transform the points onto a new surface; however, it can still be solved, assuming the stylus stays on a fixed plane.
Kalman Filter for improved accuracy, precision, and responsiveness
How did this improve the product?
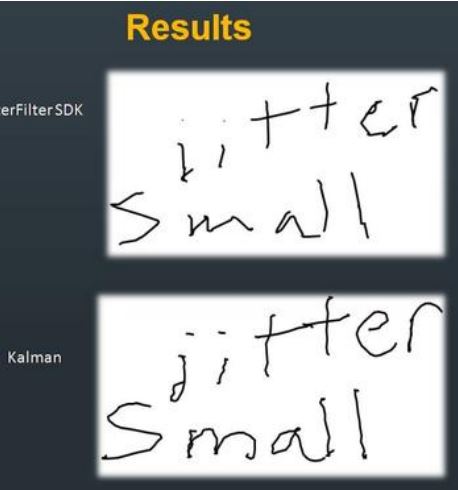
There were two notable challenges that this filter solved. First, our stylus data was noisy, meaning that the cursor would randomly move about it's true target, effectively jittering as it wrote. Our production software did apply a filter to reduce this jitter, though it was difficult to tune, since it struggled to differentiate between real signal and noise. In contrast, the Kalman filter I implemented was able to reduce the jitter/noise by 2.5x, with no significant loss of detail.
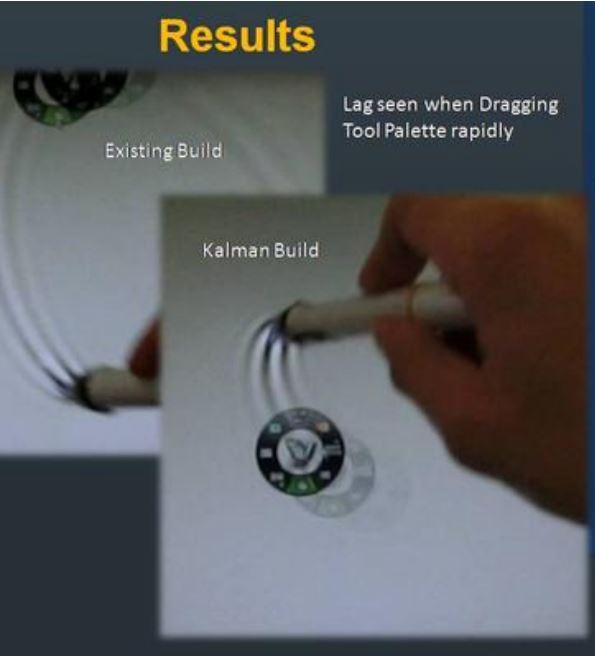
Additionally, the latency was fairly large, causing faster drawing and movements to lag significantly behind the stylus. This actually happens with your mouse too, but it becomes painfully obviously when a projector/TV is attempting to overlay a cursor or drawing a line, which starts to lag the stylus by 8-10 inches. This filter improved that, cutting the latency in half.
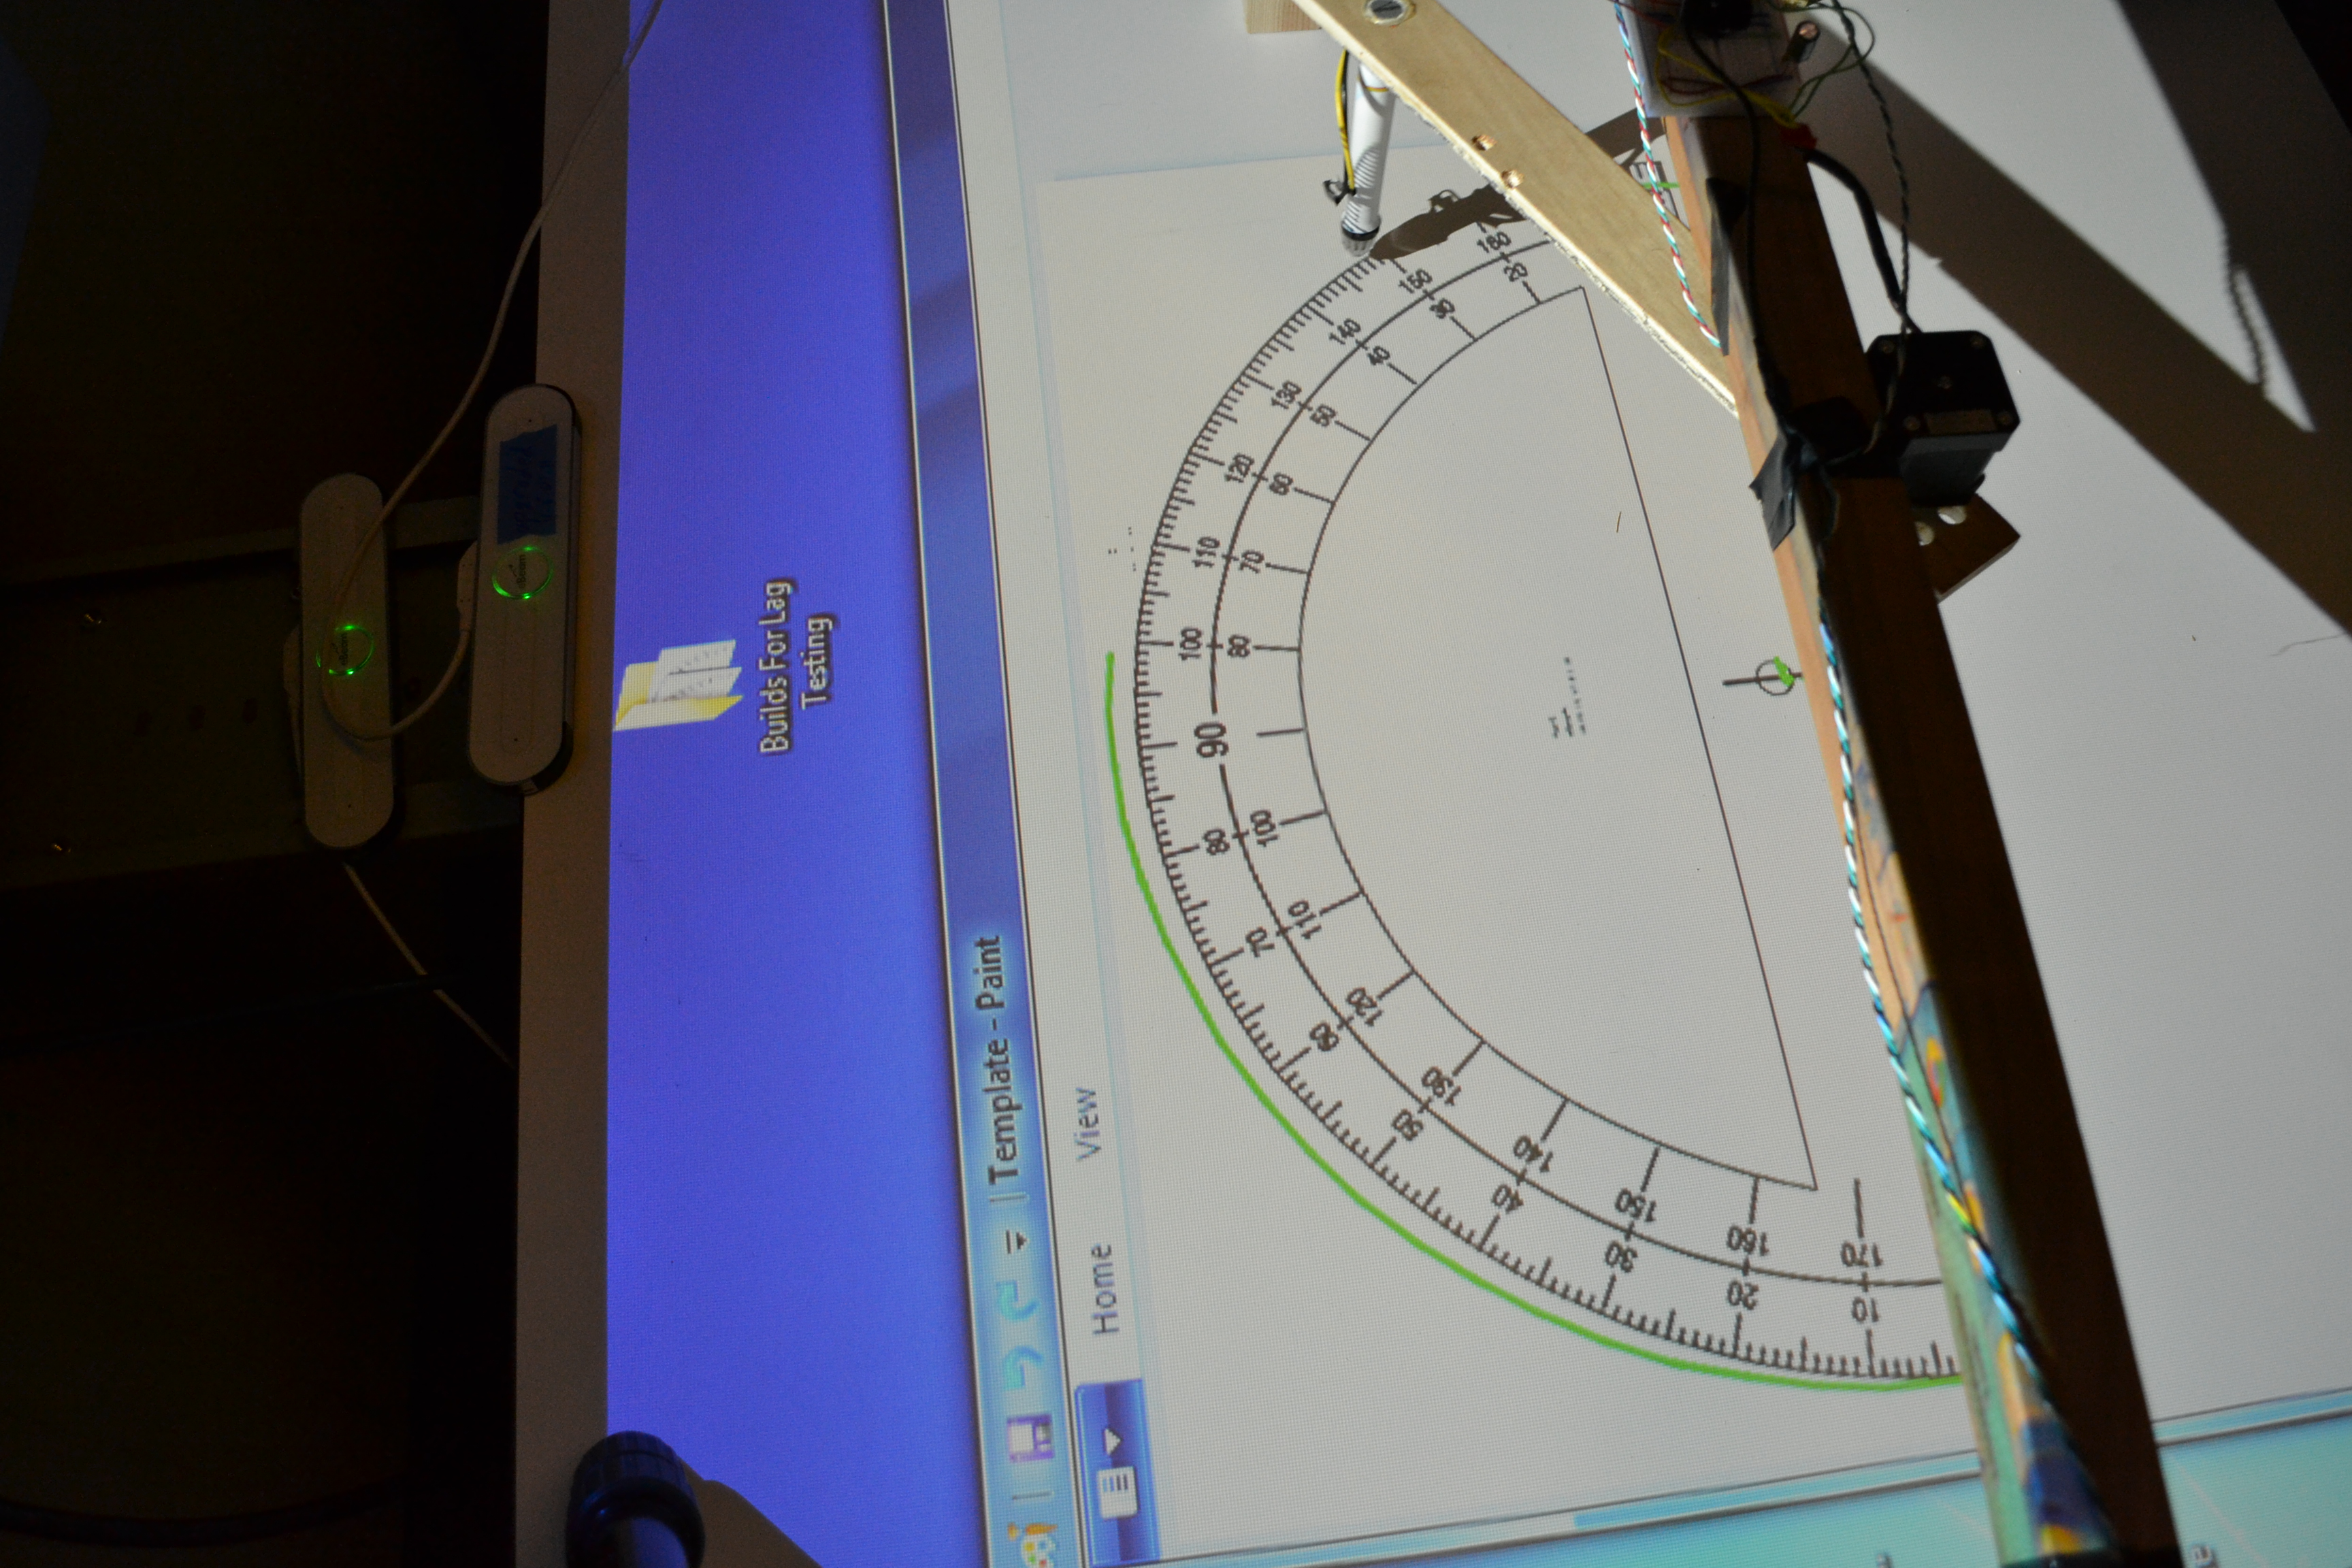
I actually built a test rig specifically for this project, so that we could profile
the latency of our stylus, quantify any improvements, and analyze our competitors.
The test rig had a mount for the stylus, and a stepper motor spinning at a known fixed
rate along an over-sized protractor. A DSLR with an external trigger captured the stylus
along with the delayed cursor and drawings on the canvas. With this, it was easy to
count how many degrees the graphics were delayed, and convert that to time.
How do Kalman Filters work? How is one written for a specific application?
Kalman filters are fantastic tools for integrating real-world sensor data. The power of the sensor comes from it's ability to use statistics to integrate multiple measurements, and even predict future results. Fundamentally, the Kalman filter just alternates between two steps:
- The Measure Update: Measure the position of the stylus using the sensor data, and use that to update the estimate of the current location.
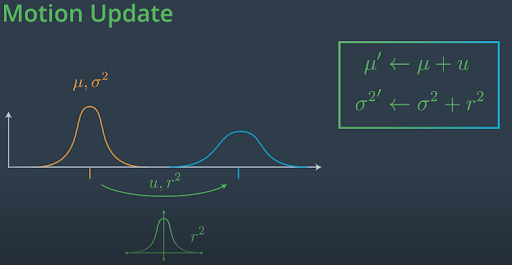
- The Motion Update: We don't have anything to measurement our movement between points, so we're going to have to guess the future positions using a physics-based model.
We're going to have to discuss a bit of statistics now. If that's not you're thing, just skip the next few equations: and gaussian distributions to track the estimated position as well as the uncertainty associated with that estimate. I'll share the math in a moment, but fundamentally we're just going to say that any new measurement shifts the location estimate towards the spot that we just measured. Any, and also makes us more confident in our estimate. Any motion estimate makes us less confident
I'll try to keep it light, but we're going to need some basic stats now...
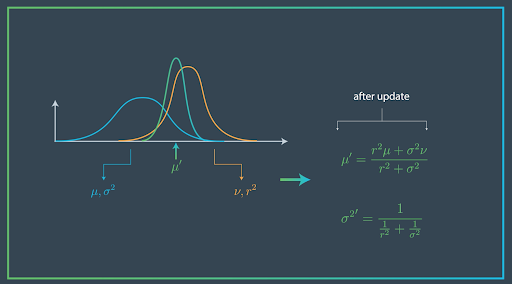
In reality the measurement and motion updates are tracking Gaussian distributions, with a mean and standard deviation.
- Measure Update: The eBeam sensor data is still a good estimate of the mean of the distribution. However, we also need to provide an estimate of the variance. Due to the geometry of the eBeam sensor, this varies depending on the location, on the board, but for simplicity we can just use a configurable constant value. That measurement is integrated with the previous estimate of our location (called the prior probability distribution). The resulting mean is a just an average of the measurement mean and the prior mean, weighted by their variances. This means that the more confident an estimate is, the more the resulting mean will match it. The means are combined in a way that guarantees the variance always shrinks, because the more data we collect, the more confident we become.
- Motion Update: In order to estimate how far the stylus has moved between measurements, we need to write a physics based model. I ended up assuming acceleration was constant in my model. Obviously this assumption is not perfect, but the stylus doesn't change acceleration very much in 15ms. This result then gets combined with the prior probability distribution. The mean just moves by the amount calculated with the physics-based model, and the means add as root sum of squares (RSS).
Using the physics model, we were actually able to predict where the stylus would be 15ms or more into the future. In practice, I ended up predicting 2 cycles (30ms) ahead, cutting our effective latency in half, while still decreasing position variance (pen jitter) by 2.5x. The only time the the inaccuracy of this prediction was noticeable was in handwriting with tight loops (o's and l's). However, nearly all hand-writing was performed in our canvas app, where we could quickly replace the predicted estimates with the more precise measurement update terms.
Stylus responsiveness firmware
Our stylus took 18ms to wake up, meaning that the first point in a character is often missed. In english, this really only has a significant impact on a lower case 'i'. However, our japanese clients noticed this impact more significantly. In order to address this, I added a keep alive time to the the stylus firmware, so that it went off after a few seconds of idling, but stayed awake between characters when writing text.